How to Create a Power Automate Flow for Operations1 Events
Introduction to trigger a Power Automate Flow with Webhooks in Operations1
This guide provides step-by-step instructions for creating a Power Automate flow that responds to specific events from Operations1. You can use this to automate tasks such as notifying departments via email, sending completed reports to a database, or validating user inputs like serial numbers.
Prerequisites
- Ensure you have a Power Automate Premium subscription for advanced workflows.
- Obtain API access for Operations1.
Step-by-Step Guide to Creating Your Flow
Setting Up the Flow in Power Automate
-
Login and Setup:
- Go to Power Automate.
- From the left navigation menu, click My flows.
- Click New flow and select Instant cloud flow.
-
Name Your Flow:
- Name your flow something descriptive, like
Operations1_Task_Notification.
- Name your flow something descriptive, like
-
Set Up the Trigger:
- Choose When an HTTP request is received as the trigger.
-
Create the Flow:
- Click Create to establish the flow.
-
Add Actions to Your Flow:
-
Click the plus (+) icon to add actions.
-
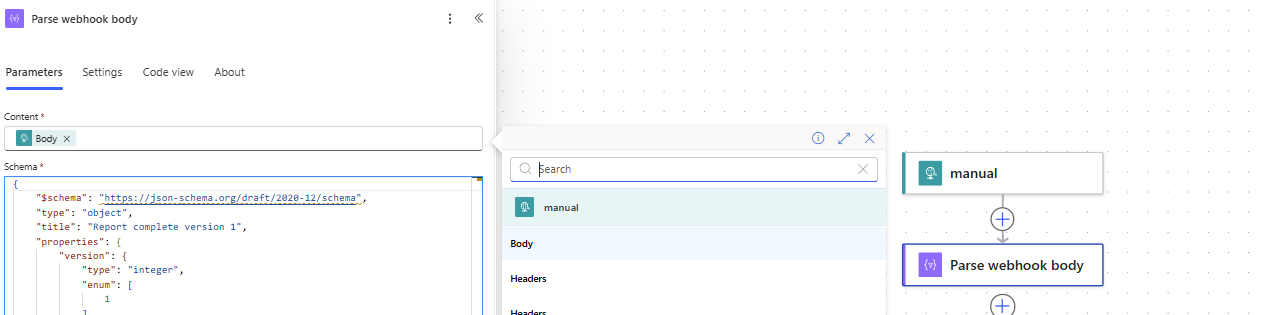
Find and add the Parse JSON action.
-
Configure the Parse JSON action:
-
Content: Use the dynamic content tool to add the body of the trigger.\
-
-
Schema: Input the schema from Operations1 task creation. (Dont use "Use sample payload to generate schema)
-
Adjust Trigger Settings:
- Modify who can trigger the flow to Anyone.
-
Save Your Flow:
- Once saved, Power Automate generates a URL for the flow.
-
Register the Flow in Operations1:
- Copy the URL from the HTTP URL field under the trigger settings.
Registering the Flow as a Webhook in Operations1
-
Access Operations1:
- Log into Operations1 and navigate to the Webhook Manager under system settings. If this isn't visible, contact your administrator for the correct permissions.
-
Create a New Webhook:
- Click New webhook, name it, choose the event type as Create task, and paste the URL of your Power Automate flow.
- Click CREATE.
Testing the Connection
-
Create a Task in Operations1:
- Go to the Task section and click New task.
- After entering the necessary details, save the task.
-
Verify the Flow Trigger:
- In Power Automate, go to My flows and select your flow.
- Check the run history to see if the flow was triggered by the new task creation.
Congratulations! You've successfully connected your Power Automate Flow with Operations1.
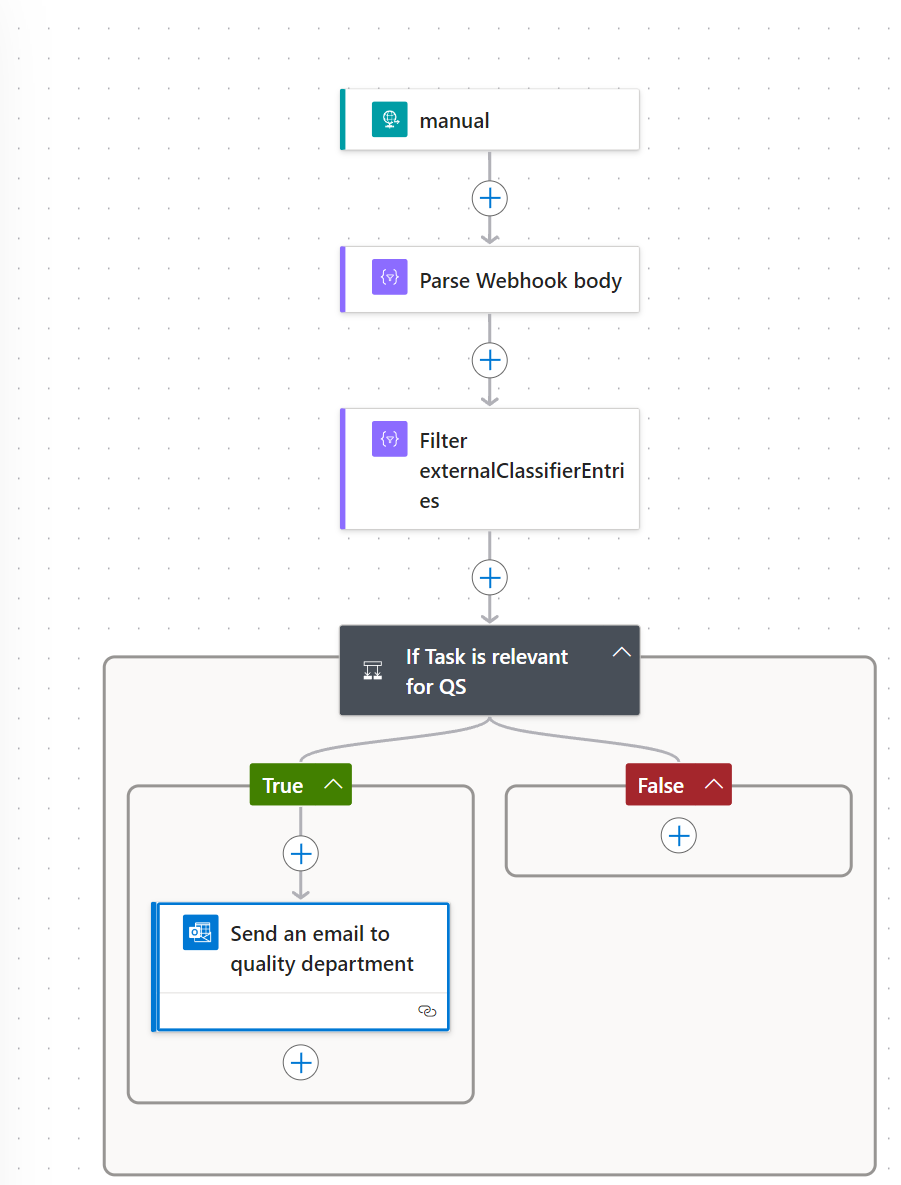
Implementing Your Use Case: Email Notification Example
If you want to notify the quality department whenever a task with a specific classifier is created, follow these steps:
-
Add and Configure Actions:
- Filter Array: Use to check if the external classifier matches.
- Condition: Determine if the email should be sent based on the classifier.
- Send an Email: Set up using the Office 365 Outlook connector. Add the email address, subject, and body of the email, utilizing dynamic content for personalization.
-
Test Your Flow:
- Make adjustments and retest as needed.
By following these steps, you can adapt the flow to handle various scenarios, customizing the email content or recipients based on different classifiers from Operations1. This guide can serve as a foundation for many automation processes within your organization, leveraging the capabilities of Power Automate and Operations1.
Updated 11 months ago